
你有没有想过,自己动手搭建一个只属于你的以太坊私链?想象在这个私链上,你可以自由地发行代币、部署智能合约,甚至进行一场虚拟的加密货币交易大战。今天,就让我带你一步步走进这个神奇的世界,一起创建属于你的以太坊私链吧!
一、准备工作:工具与材料
首先,你需要准备以下工具和材料:
1. 操作系统:Windows或Linux操作系统均可,这里以Ubuntu为例。
2. Geth客户端:Geth是官方推荐的以太坊客户端,可以从官网下载。
3. Docker:用于部署区块浏览器,可选。
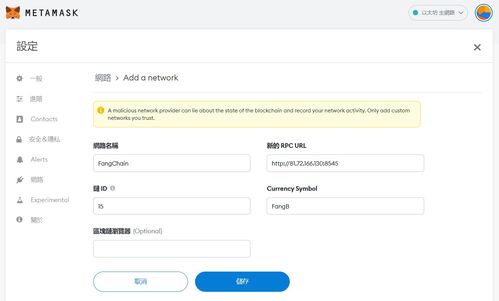
4. 域名:用于访问你的私链,可选。
二、搭建Geth客户端
1. 安装Geth:在Ubuntu上,你可以使用以下命令安装Geth:
```
sudo apt update
sudo apt install -y software-properties-common
sudo add-apt-repository -y ppa:ethereum/ethereum
sudo apt update
sudo apt install -y ethereum
```
2. 创建私链配置文件:在Geth目录下创建一个名为`prichain`的文件夹,并在其中创建一个名为`genesis.json`的文件,内容如下:
```json
{
\config\: {
\chainId\: 12,
\homesteadBlock\: 0,
\eip155Block\: 0,
\eip158Block\: 0
},
\alloc\: {},
\coinbase\: \0x0000000000000000000000000000000000000000\,
\difficulty\: \0x1\,
\extraData\: \\,
\gasLimit\: \0x2fefd8\,
\nonce\: \0x0000000000000066\,
\mixhash\: \0x0000000000000000\,
\parentHash\: \0x0000000000000000000000000000000000000000000000000000000000000000\,
\timestamp\: \0x00\
}
```
3. 初始化私链:在`prichain`文件夹下创建一个名为`data0`的文件夹,然后使用以下命令初始化私链:
```
geth --datadir data0 init genesis.json
```
4. 启动私链节点:使用以下命令启动私链节点:
```
geth --datadir data0 --networkid 12 console
```
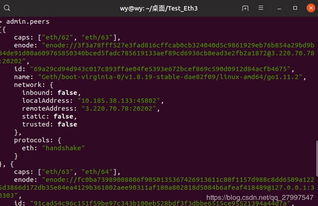
这时,你将进入Geth的控制台,可以看到你的私链已经启动。
三、搭建区块浏览器(可选)
如果你想要更直观地查看你的私链,可以尝试搭建一个区块浏览器。这里以Blockscout为例。
1. 安装Docker:在Ubuntu上,你可以使用以下命令安装Docker:
```
sudo apt update
sudo apt install -y apt-transport-https ca-certificates curl software-properties-common
curl -fsSL https://download.docker.com/linux/ubuntu/gpg | sudo apt-key add -
sudo add-apt-repository \deb [arch=amd64] https://download.docker.com/linux/ubuntu $(lsb_release -cs) stable\
sudo apt update
sudo apt install -y docker-ce docker-ce-cli containerd.io
```
2. 创建Docker Compose文件:在`prichain`文件夹下创建一个名为`docker-compose.yml`的文件,内容如下:
```yaml
version: '3'
services:
blockscout:
image: blockscout/blockscout
ports:
- \3000:3000\
environment:
- BLOCKSCOUT_NODE_URL=http://localhost:8545
- BLOCKSCOUT_NETWORK_ID=12
- BLOCKSCOUT_CONTRACTS_API_URL=http://localhost:8545
- BLOCKSCOUT_API_URL=http://localhost:3000
- BLOCKSCOUT_API_KEY=
- BLOCKSCOUT_API_SECRET=
- BLOCKSCOUT_API_TIMEOUT=30
- BLOCKSCOUT_API_TIMEOUT_RETRIES=3
- BLOCKSCOUT_API_TIMEOUT_BACKOFF=1.5
- BLOCKSCOUT_API_TIMEOUT_BACKOFF_MAX=32
- BLOCKSCOUT_API_TIMEOUT_BACKOFF_FACTOR=2
- BLOCKSCOUT_API_TIMEOUT_BACKOFF_MIN=1
- BLOCKSCOUT_API_TIMEOUT_BACKOFF_MAX_FACTOR=4
- BLOCKSCOUT_API_TIMEOUT_BACKOFF_FACTOR_MIN=1
- BLOCKSCOUT_API_TIMEOUT_BACKOFF_FACTOR_MAX=4
- BLOCKSCOUT_API_TIMEOUT_BACKOFF_FACTOR_MIN_FACTOR=1
- BLOCKSCOUT_API_TIMEOUT_BACKOFF_FACTOR_MAX_FACTOR=4
- BLOCKSCOUT_API_TIMEOUT_BACKOFF